Twilight Real Estate Photography: How to Shoot & Fake It
By the Plotpane Editorial Team · Published June 3, 2026 · Last updated June 3, 2026 · ~13 min read
A single twilight photo is the closest thing a listing has to a guaranteed scroll-stopper. It's the frame that makes a buyer pause mid-scroll, and it's the reason agents happily pay a premium for it. The catch is that the light only cooperates for about twenty minutes a day — so you either learn to own that window, or you learn to recreate it.
This guide covers both. First, exactly how to shoot twilight real estate photography in the field: the timing, the gear, the camera settings, and the mistakes that quietly ruin otherwise great frames. Then, what to do when the window is gone — how to fake a convincing twilight from a plain daytime photo without a reshoot.
Quick Summary: Shoot twilight during the ~20-minute golden or blue hour, on a tripod, at f/8–f/11 and ISO 100–320, bracketing 3–5 exposures per composition. Missed the window, or only have midday shots? AI day-to-dusk converts a daytime exterior into twilight with warm window glow in about 90 seconds at 4K — no reshoot, no overnight editor.
What twilight real estate photography actually is
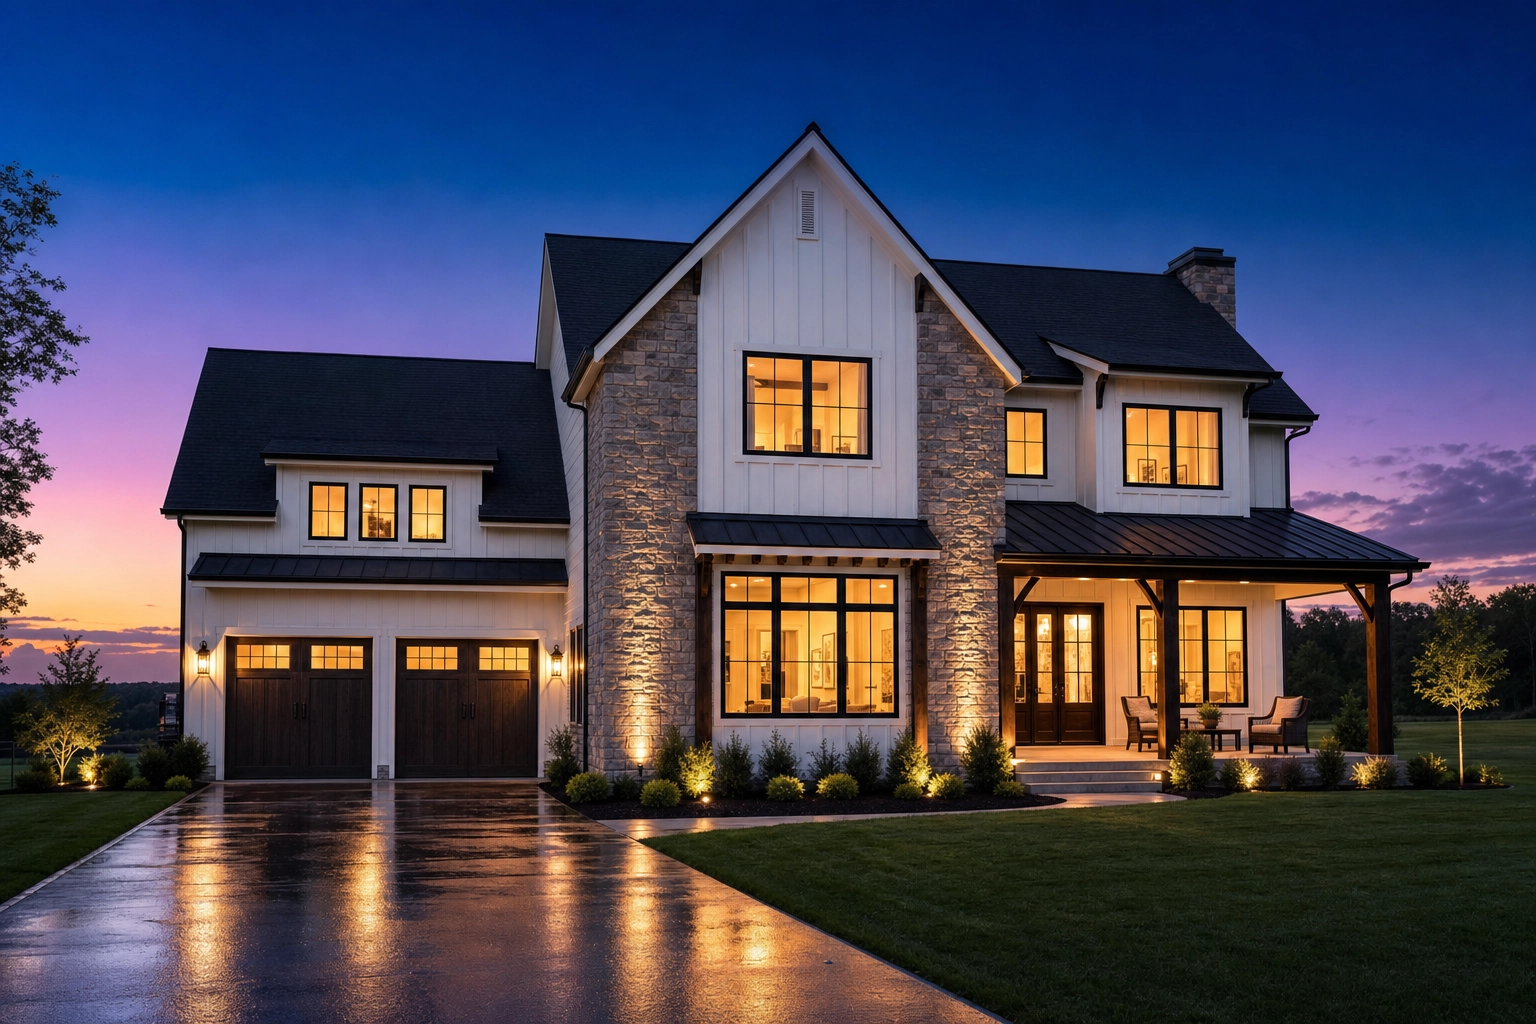
Twilight real estate photography is the practice of photographing a property's exterior during the golden hour or blue hour — the brief stretch around sunset (or sunrise) when the sky turns warm or deep blue and interior lights glow invitingly through the windows. The result reads as aspirational: a home that looks lived-in, warm, and a little cinematic — the kind of curb appeal that lifts click-through on listing portals and pays off across an agent's marketing.
It's worth being precise about the two looks, because they aren't the same:
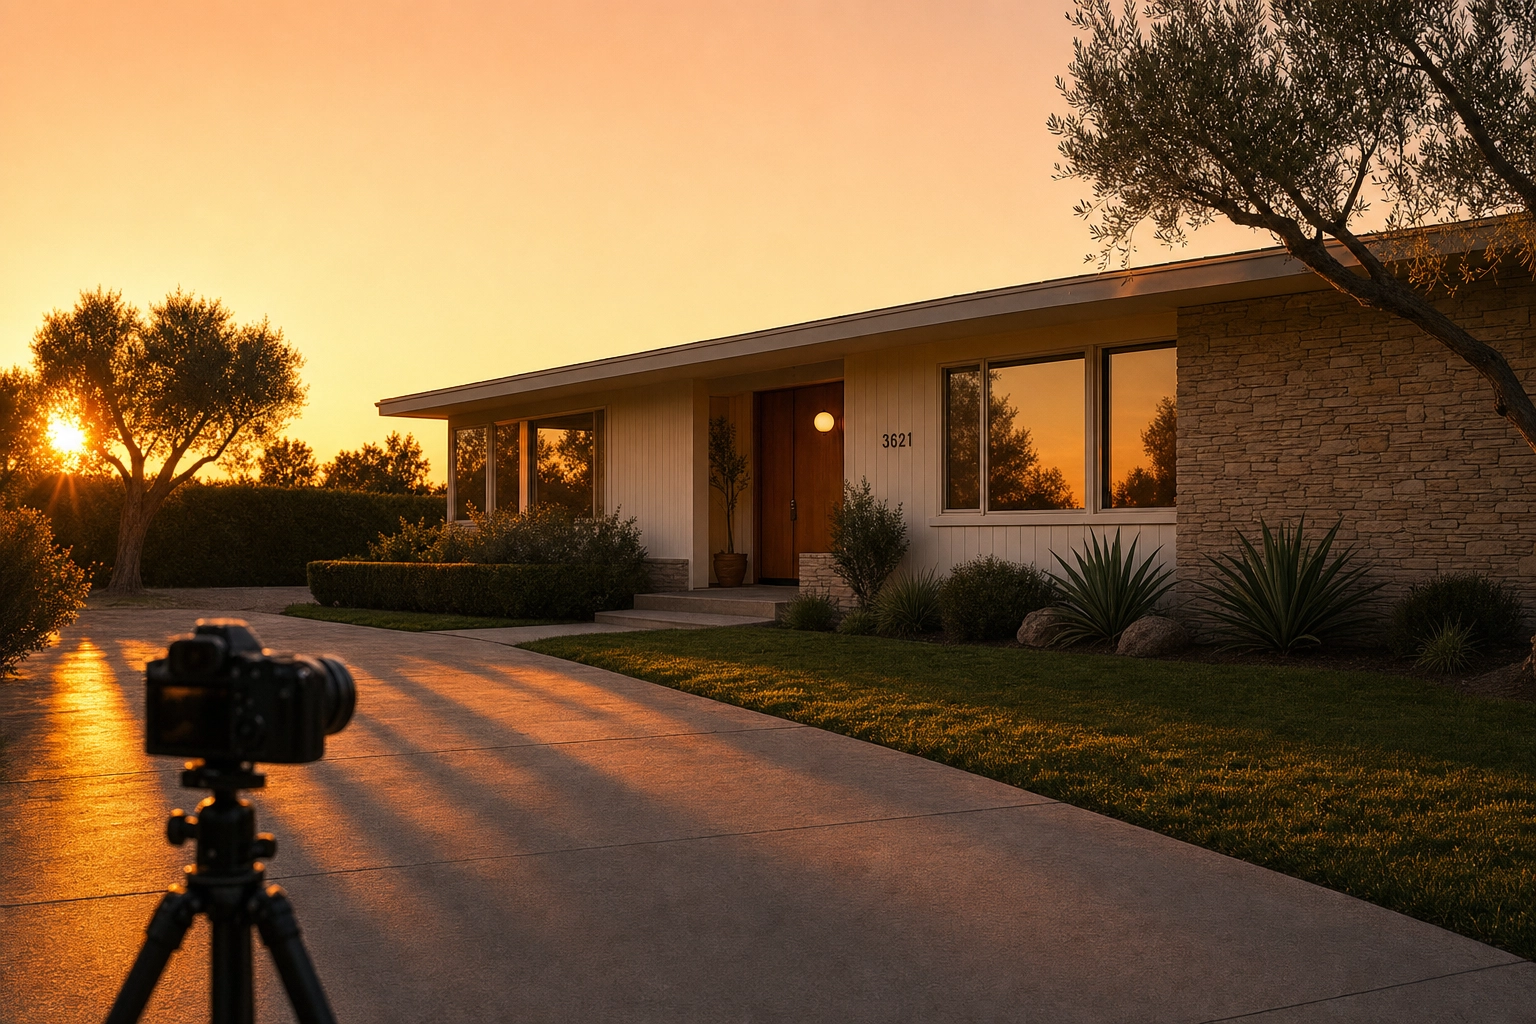
- Golden hour falls in the roughly 20–40 minutes before sunset (and after sunrise). The light is warm and directional, with long shadows that flatter textures and traditional architecture.
- Blue hour is the window just after sunset (and just before sunrise), when the sky deepens to cobalt and the warm window glow pops hardest against it. This is the classic "luxury" twilight look, and it suits modern, coastal, and glass-heavy homes.
The reason agents chase this look is simple: it works. Listings that use a twilight image as the main listing photo average about 76% more views than those without one — and even a single twilight image in the set is tied to roughly 66% more views — according to widely cited analyses of Zillow listing data. Around 74% of agents already use or want sunset and twilight photography, and the format is associated with up to 3x more showings. Major brokerages echo the effect; Redfin notes that twilight photos help homes sell faster by improving curb appeal and emotional pull. And Zillow's own research shows that more listing views, saves, and shares correlate with faster sales and stronger prices — exactly what a strong hero image drives.
Why dusk specifically reads as "home" to the human brain — the contrast ratios, the color-temperature psychology — is a rabbit hole worth exploring. We unpack it in the science of why twilight shots close listings. This guide stays focused on execution.
The 20-minute window: when to shoot twilight photos
Here's the hard truth that catches new shooters off guard: the usable twilight window is only about 20 to 30 minutes, and the richest band of color often lasts barely 10 minutes. The light also changes fast within that window — what's perfectly balanced at minute three is gone by minute fifteen. You don't get to experiment on site. You execute a plan.
Golden hour gives you warm, glowing light and long shadows; it's forgiving and flattering, and it's the safer bet if you're still building confidence. Blue hour is more dramatic and more demanding — the light drops quickly and you're balancing a dim sky against bright artificial light. Most pros shoot straight through the transition, starting a few minutes before sunset and working until the sky goes black.
To find your exact window for a given address and date, use a sun calculator. Timeanddate.com's sunrise and sunset tool gives precise golden- and blue-hour times by location, and planning apps like PhotoPills and SunCalc map where the sun will actually sit relative to the house. That matters: you want the colored sky behind or beside the home's best facade, not blasting into your lens.
Two more timing realities:
- Season changes everything. Summer's high sun angle makes for a short, steep window; winter twilight is moody and atmospheric but cold and brief, as Redfin points out in its seasonal breakdown. Plan the shoot around the calendar, not just the clock.
- Scout the day before. Trees, neighboring buildings, and hills can swallow your sky and shorten the window further. Walk the property in advance, pick your angles, and know where the sun sets relative to the house.
Gear checklist for twilight real estate photography
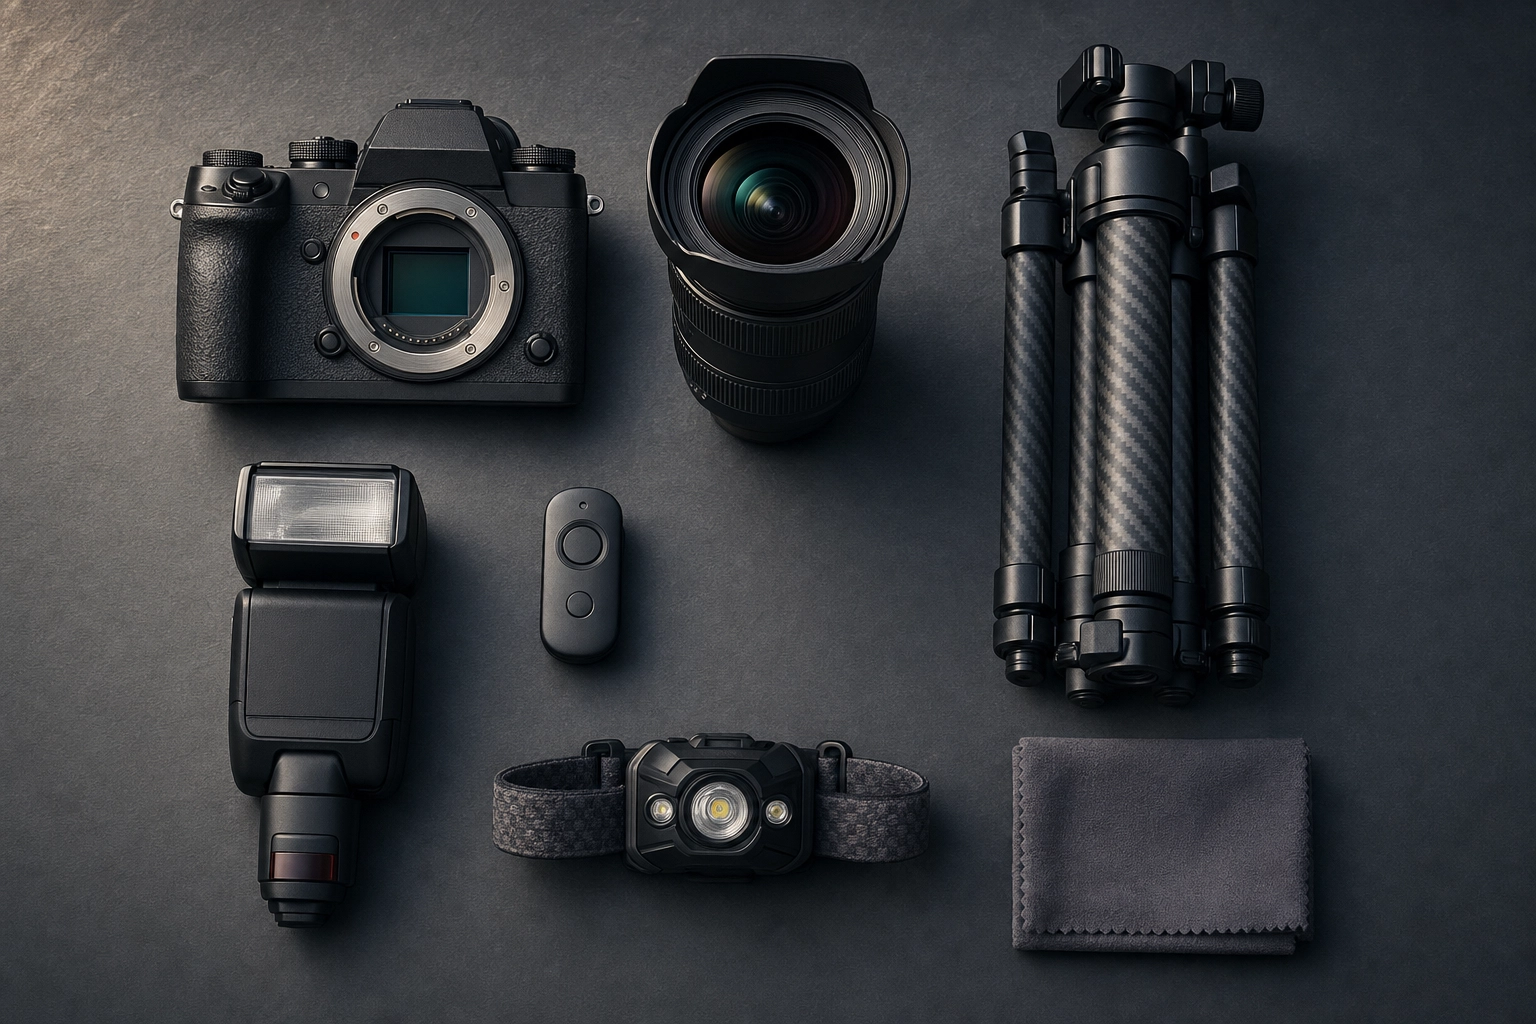
You don't need a truck full of equipment, but a few items are non-negotiable once the light drops:
- A sturdy tripod. This is the single most important piece of gear. After sunset you'll be shooting multi-second exposures, and no human hand is steady enough for that. (It's true even if you're shooting on a phone.)
- A fast, wide lens. A 16–35mm or 24–70mm at f/2.8 covers exteriors and interiors and gathers light well in dim conditions.
- A remote release or 2-second timer. Pressing the shutter by hand introduces shake on long exposures; let the timer trip it.
- A headlamp. You'll be adjusting settings and moving in near-darkness. Hands-free light keeps you fast.
- An optional wireless flash. Not essential, but useful for filling dark corners and taming mixed indoor lighting. Bounce it off a wall or ceiling rather than firing it straight on.
The same kit handles the rest of the listing, so nothing here is twilight-specific overhead.
Camera settings for twilight real estate photography
Twilight is a balancing act. Your settings have to capture the fading natural light and the warm artificial glow from inside the home at the same time, while staying sharp and free of noise. Shoot in Manual mode and in RAW — you'll need the latitude in post to balance interior against exterior and to fix color. Here's the working baseline, then the reasoning behind each number.
Twilight settings at a glance:
- File: RAW
- Mode: Manual
- Aperture: f/8–f/11
- ISO: 100–320
- Shutter: matched to the light (≈1/4s up to ~4s on a tripod)
- Focus: manual or Live View + zoom; hyperfocal for speed
- Drive: 3–5 bracketed exposures, 1–2 stops apart
- Support: tripod + remote or 2-second timer
Aperture: f/8 to f/11
Shoot between f/8 and f/11. This range keeps the whole scene — facade, foreground landscaping, and background — acceptably sharp, which is exactly what real estate buyers want. A useful side effect: stopping down toward f/11–f/14 on a wide lens turns streetlights and porch lights into subtle sunstars. Don't overdo it, though — push past f/11 and diffraction starts to soften the image. f/8 to f/11 is the sweet spot between depth of field and sharpness.
ISO: 100 to 320
Keep ISO between 100 and 320 to keep grain out of those big, smooth sky gradients. The tripod is what buys you a clean image, not a high ISO. If you're racing a fast-dropping blue hour and need shorter exposures, you can raise ISO to 400–1600 — but you'll trade in noise, so learn your specific camera's clean ceiling before you rely on it.
Shutter speed, focus, and white balance
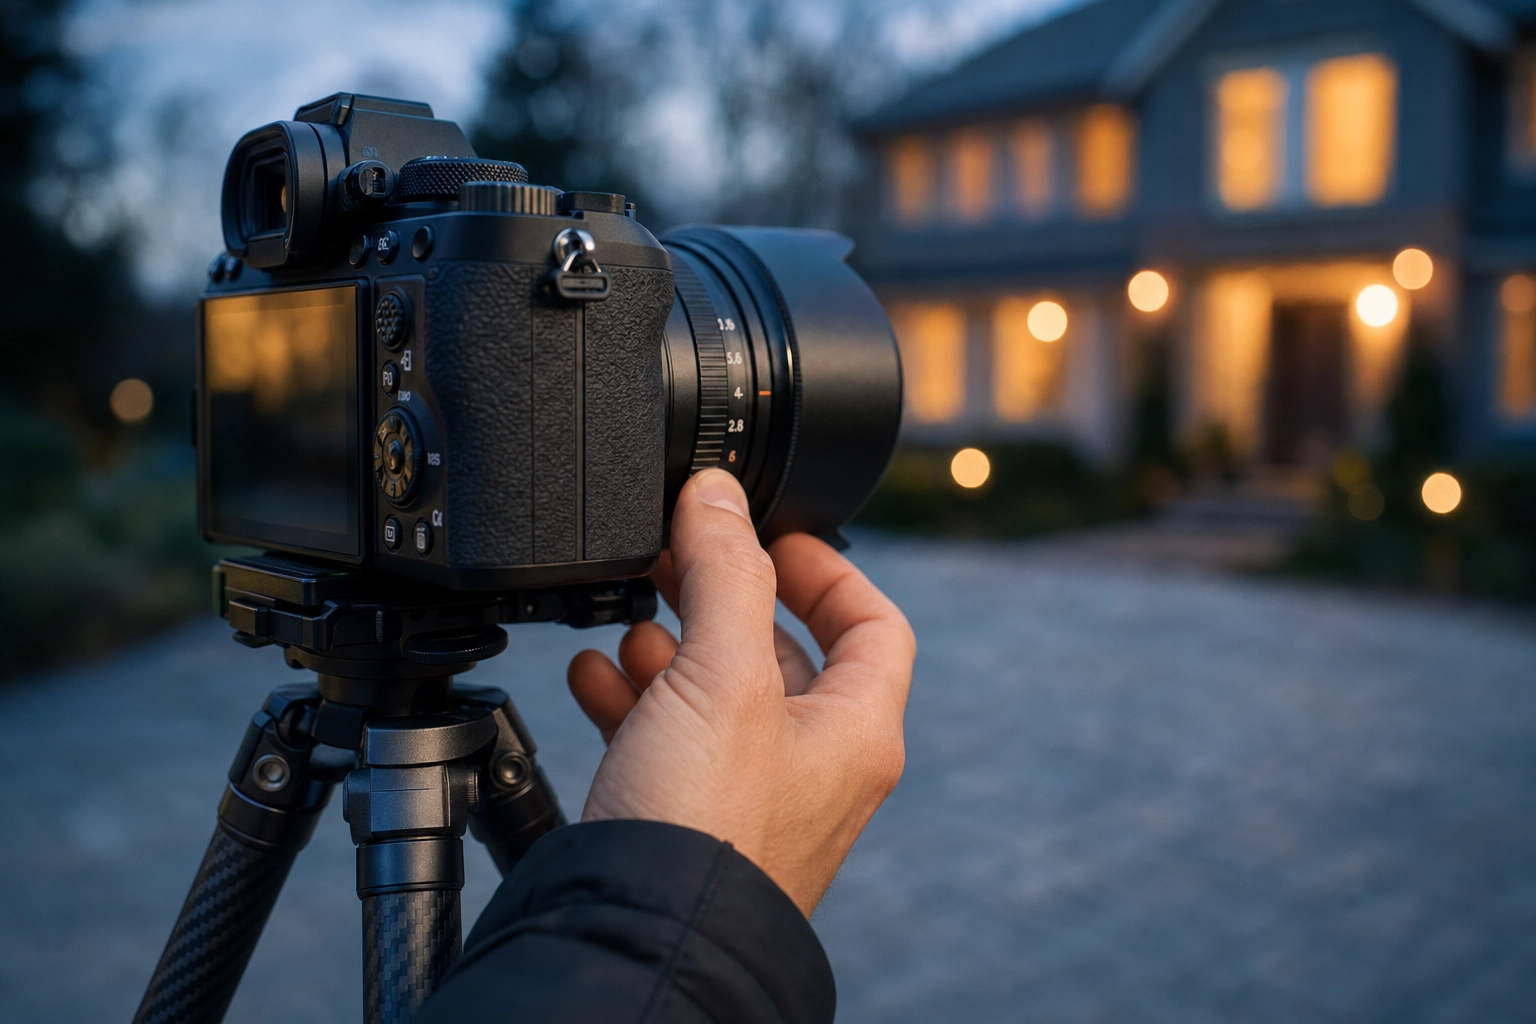
Shutter speed is your variable. As the light fades, slow it down to compensate — anywhere from a fraction of a second early in golden hour to around four seconds at true twilight. With a tripod and a timer, long exposures are no problem; without one, they're impossible.
For focus, switch to manual or use Live View and zoom in to confirm critical sharpness on the facade. Better yet, set your lens to the hyperfocal distance and leave it — that way you're not refocusing between frames and burning precious minutes.
White balance is the part that trips people up most. Homes mix tungsten, LED, and daylight-balanced sources, each throwing a different color cast, and the sky's color is shifting by the minute. Shooting RAW lets you correct all of it later instead of fighting it on site. A bounced flash can also help neutralize a room's color so the warm glow looks intentional rather than muddy.
How to shoot twilight photos: a step-by-step workflow
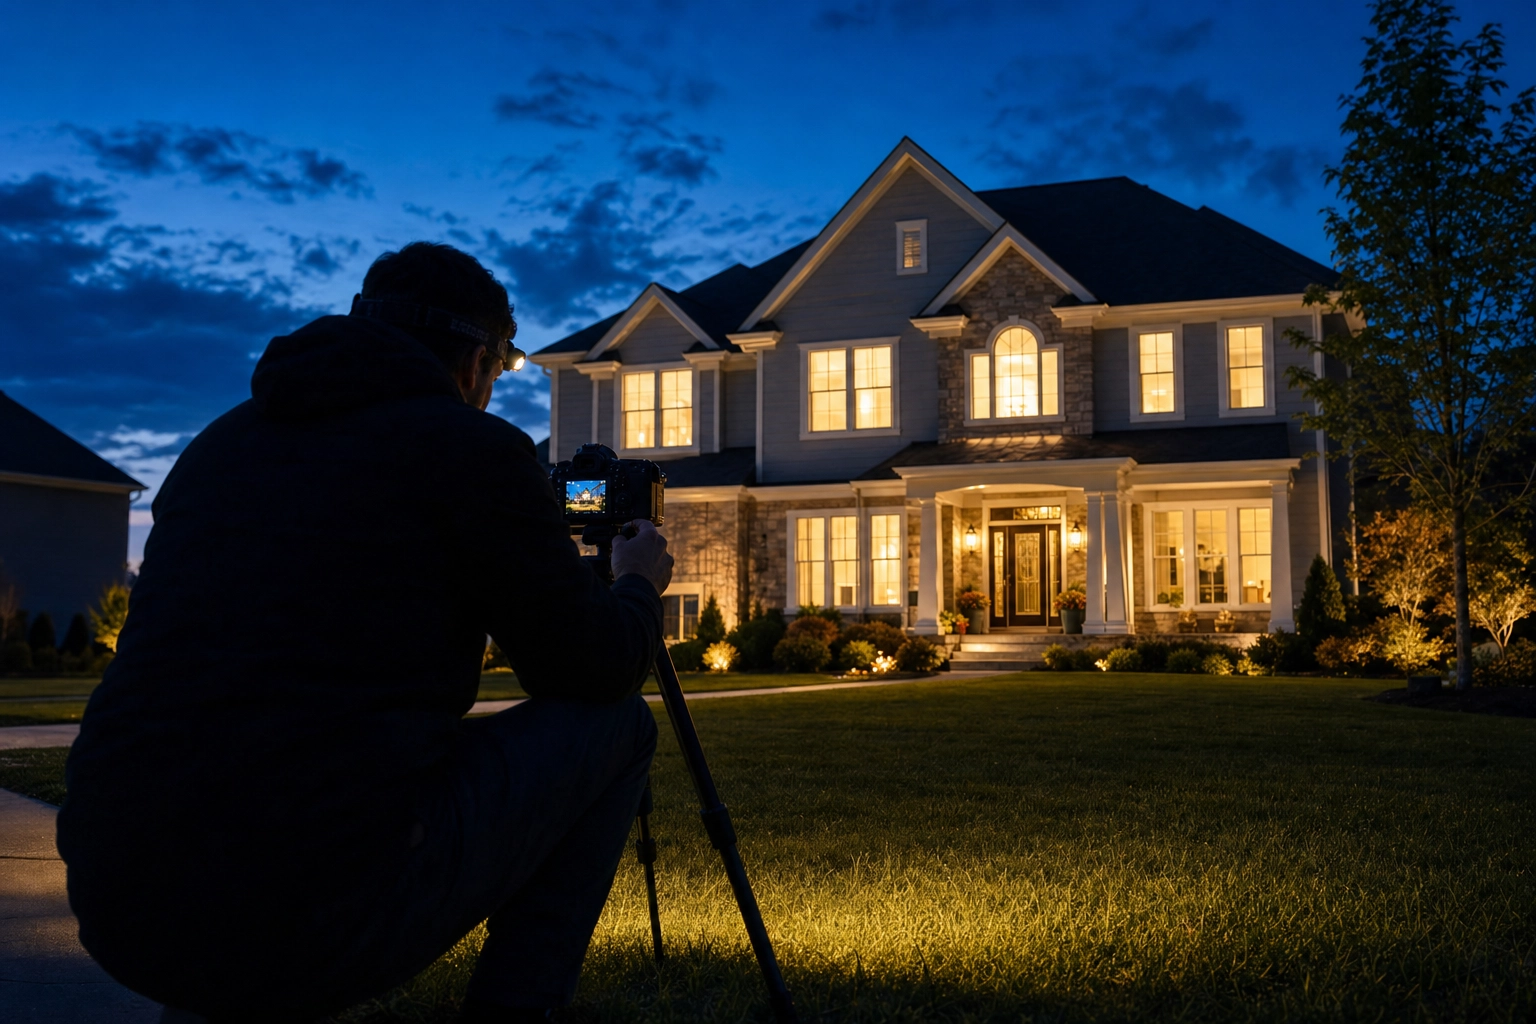
Because the window is so short, a twilight shoot is mostly won before the sun goes down. Here's the workflow professionals use.
- Arrive 60–90 minutes early and light the house. Turn on every light — interior, exterior, porch, landscape, and pool. Dark windows are the fastest way to kill the effect. Then declutter the exterior: hoses, bins, cars, and toys all read louder at dusk than they do at noon.
- Scout and lock 3–5 hero compositions in daylight. Decide your angles while you can still see them. Improvising once the light drops is how shooters end up with thirty mediocre frames and no keeper.
- Set up the tripod and dial in your settings. Mount the camera, frame your first composition, and set f/8–f/11, ISO 100, RAW, manual focus. Meter off the scene and confirm sharpness with Live View.
- Bracket 3–5 exposures per composition. Shoot a sequence 1–2 stops apart with a correctly exposed midpoint. Three brackets usually cover an interior; exteriors just after sunset stretch your camera's dynamic range, so grab a couple extra. Bracketing gives you clean shadows and controlled highlights to blend later.
- Work your shot list fast as the light balances. Start with the best-lit facade, because the magic moment — when ambient sky light and the home's artificial light are roughly equal — passes quickly. Move efficiently from one locked composition to the next.
- Blend and finish in post. Merge your brackets to HDR, balance the interior glow against the exterior, deepen the sky's color tastefully, and remove any distractions you couldn't fix on site. This is where a good capture becomes a great listing photo.
Common twilight photography mistakes (and how to avoid them)

Even experienced shooters lose twilight frames to a handful of repeat offenders:
- Not scouting in daylight. The window is too short to compose on the fly. Walk it first.
- Ignoring reflections. Pools, glass doors, and polished floors bounce back camera gear, flashes, and stray lights. Check every reflective surface during setup and shift your angle — or add a polarizing filter — before the light goes.
- Chasing too many angles. Five polished frames beat thirty rushed ones. Resist the urge to "get everything."
- A tripod that isn't locked down. Legs sinking into soft grass or set unevenly produce a subtle blur you won't catch until you're back at the computer. Plant it firmly and check it.
- Forgotten lights. One dark window in an otherwise glowing facade reads like a missing tooth. Do a final lights-on walk-through before you shoot.
- Over-cooking the edit. This is the big one. Neon-purple skies, haloed rooflines, and crushed shadows scream "fake," and buyers notice. Real estate forums are full of agents calling out twilight edits that look artificial or even "creepy." The goal is believable, not radioactive.
Missed the window? How to fake twilight with AI day-to-dusk

Here's what the gear guides don't tell you: most of the time, the live window simply isn't an option. The weather turns. The listing goes live tomorrow morning. You shot the whole property at 1 p.m. and there's no second trip in the budget. This is the gap that virtual twilight — also called day-to-dusk conversion — exists to fill.
AI Day-to-Dusk takes a single daytime exterior and relights it into twilight, complete with a colored sky and warm window glow, in about 90 seconds, at up to 4K resolution, with no watermark. Crucially, it's structure-preserving: it relights the scene you actually photographed and never invents architecture, windows, or rooflines that aren't there. That's the difference between a believable twilight and the over-cooked fakes buyers scroll past.
Speed is the other half of the story. Traditional virtual twilight means uploading to a human editing service and waiting — the overnight-to-multi-day turnaround you get from outfits like BoxBrownie, Styldod, or esoft, billed per image. A live reshoot, meanwhile, runs into what real estate photographers charge per shoot — often $100–$300 just for the twilight add-on. AI conversion compresses that to roughly a minute and a flat subscription, which is why it's become the default for high-volume real estate photographers and busy agents alike.
A few practical notes for getting a convincing result:
- Pick the right look. Warm, golden Day-to-Dusk suits traditional and warm-toned homes; deep-blue Cool Twilight flatters modern, glass, and coastal architecture. Match the mood to the building.
- Start from a clean source. The conversion is only as good as the input. Use a well-exposed, front-lit daytime exterior with a clear view of the windows and sky. Heavy shadows and a blown-out sky give the AI less to work with.
- Stack the finishing tools. Pair the conversion with Sky Swap for a richer sky and Auto Enhance to balance exposure and color, and you've got a finished hero shot from a single upload.
If you want the whole approach in one place, our day-to-dusk photo editing walkthrough shows the full conversion from daytime upload to listing-ready twilight.
Is virtual twilight allowed? Honesty and MLS disclosure
Yes — virtual twilight is widely accepted, as long as the image represents the property honestly and doesn't mislead buyers. The line is simple: enhancing the light and sky is fine; inventing features, views, or a pool that don't exist is not.
Two things keep you on the right side of that line. First, structure-preserving edits mean the home in the photo is the home in real life — same windows, same rooflines, just at a different time of day. Second, Plotpane writes invisible XMP disclosure metadata into every rendered file, so the edit is documented inside the image itself. What the tool does not do is write your MLS listing-remarks disclosure for you — that's still your responsibility as the agent, and the exact rules vary by market. (Our science of day-to-dusk guide covers the disclosure rationale in more depth.)
One more best practice echoed by Redfin and most MLS guidance: twilight is a complement, not a replacement. Use it as the hero or among the first images, then back it up with honest daytime photos — interiors, room detail, and even an aerial or drone exterior — that show the property as it really is. Two to five twilight frames per listing is plenty.
Shoot it or fake it? A quick decision guide
There's no single right answer — the best shooters do both. Use this to decide per listing:
Shoot it live when:
- It's a flagship or luxury listing where a real twilight hero justifies the trip.
- The weather is cooperating and the sky will actually deliver.
- You can be on site and own the full 20-minute window without rushing.
Fake it with AI day-to-dusk when:
- You missed the window or only have midday photos.
- The weather killed the sky and a reshoot isn't realistic.
- You're processing volume on a deadline and need consistency across the listing.
For most agents and photographers, the honest answer is "capture it when you can, convert it when you can't." Either way, the win is consistency: a twilight hero that matches the rest of the set and goes live on time. You can compare plans and render limits on the Plotpane pricing page, or start converting daytime exteriors with AI Day-to-Dusk.
Frequently asked questions
What is twilight real estate photography?
Twilight real estate photography is the practice of photographing a property's exterior during the golden hour or blue hour — the short window around sunset or sunrise — so the sky is colorful and the windows glow warmly. It makes a home look inviting and premium, and it consistently drives more listing views than standard daytime photos.
When is the twilight window and how long does it last?
The usable window is roughly 20–30 minutes, and the most colorful band can last only about 10 minutes. Golden hour is the ~20–40 minutes before sunset (warm light); blue hour is the period just after sunset (deep-blue sky). Use a sun calculator like timeanddate.com to find the exact times for your address and date.
What camera settings are best for twilight real estate photography?
Shoot in Manual mode and RAW, at f/8–f/11 for sharpness, ISO 100–320 to minimize noise, and a shutter speed matched to the fading light — from a fraction of a second up to about four seconds on a tripod. Bracket 3–5 exposures per composition, one to two stops apart, and blend them in post.
Do you need a tripod for twilight photos?
Yes. After sunset you're shooting exposures far too long to hold steady by hand, so a sturdy tripod is essential for sharp images — even if you're shooting on a phone. Pair it with a remote release or a 2-second timer to avoid shake when the shutter fires.
How many twilight photos should a listing have?
Two to five high-quality twilight images is plenty for most listings. Twilight shots are meant to complement your daytime photos, not replace them — use one as the hero or among the first images, then let detailed daytime photos carry the rest of the gallery.
Can you fake twilight from a daytime photo?
Yes. AI day-to-dusk conversion relights a daytime exterior into a twilight scene — colored sky, warm window glow — in about 90 seconds, with no reshoot. It works best from a clean, well-exposed, front-lit daytime photo with a clear view of the windows and sky.
Do AI twilight photos look fake — and how do you avoid it?
They look fake when they're over-cooked: neon skies, glowing halos, and crushed shadows. The fix is restraint and fidelity — a structure-preserving conversion that keeps the home's real architecture intact, a believable sky, and a warm-but-natural window glow. Starting from a good daytime source is half the battle.
How much does twilight real estate photography cost?
A live twilight add-on from a professional photographer commonly runs $100–$300 per shoot because it requires a dedicated evening trip — see our breakdown of real estate photographer pricing. AI day-to-dusk conversion is dramatically cheaper per image on a flat monthly subscription, which is why high-volume shooters reserve live shoots for flagship listings.
Whether you nail the window in the field or convert a daytime frame after the fact, the goal is the same: a twilight hero that stops the scroll and earns the showing. Plotpane renders listing-ready day-to-dusk in about 90 seconds, at 4K, with no watermark — see pricing or start with AI Day-to-Dusk.