Interior Real Estate Photography: Rooms That Wow Buyers
By the Plotpane Editorial Team · Published June 13, 2026
A buyer's first walk-through of your listing happens on a phone screen — and interior real estate photography is what decides whether they keep scrolling or book a showing. Exteriors earn the click; interiors close the deal. This guide collects the interior photography tips working pros rely on to make rooms look bright, square, and spacious: where to put the camera, which settings to lock in, how to photograph rooms with depth, how to tame mixed light, and what to clean up before the shutter ever clicks.
Then we'll cover the honest way to rescue the frames that didn't go perfectly — correcting reality instead of inventing it.
Quick Summary: Strong interior real estate photography is mostly craft on location — a level camera at the right height, two-wall composition, and a flash-and-ambient ("flambient") blend for clean light — finished with careful editing. Shoot RAW on a tripod at f/8 and ISO 100, keep verticals dead straight, declutter every surface, and reserve post-production for fixing perspective, exposure, color, stray clutter, and empty rooms rather than faking the property.
Why interior photos decide the sale
About 97% of buyers search online before they ever set foot in a home, and they judge a listing on its photos first (National Association of Realtors). The typical buyer searches for roughly eight weeks, views nine homes, and sees five of them only online — so a weak interior gallery doesn't just underperform, it eliminates you before a showing is ever booked.
Engagement also compounds quickly. Zillow's research on listing activity found that a home pulling about 250 views a day usually goes pending within a week, while listings that clear 500 daily views often sell above asking. Sharp, professional interior photography is the cheapest lever you have on that number.
One scope note first: this is a guide to still photography. Plotpane is an image-only pipeline, so everything here is about photographs — not video tours or 3D walkthroughs. If a listing needs a virtual tour, that's a separate provider; great stills are still what stop the scroll.
Set the camera height — and keep it dead level
Camera height quietly controls how a room feels, and a level camera is the single biggest thing separating amateur interior photos from those of a seasoned real estate photographer. Two rules sit above everything else:
- Shoot below eye level. At standing eye level (~63 in) ceilings dominate and floors shrink. Most pros drop the tripod to about chest height — roughly 48 to 55 inches — for living and dining rooms, which keeps an even balance of floor and ceiling and lets natural light read evenly across the space.
- Keep the camera perfectly level. The instant you tilt the lens up or down, vertical lines start to lean and converge. Hold the camera level (no pitch) and your walls stay straight. Use the built-in electronic level or a $25 hot-shoe bubble level — don't trust your eye. It's the rule working shooters in communities like r/RealEstatePhotography repeat to every beginner: get it level in the camera, because not everything can be fixed later.
From there, adjust to each room's main surface:
- Living and dining rooms: ~48–55 in (chest height). Drop closer to 40 in when you want furniture to feel grounded and prominent. Adobe's interior photography guide goes as low as "kid height," about 30–36 inches, for detail-driven shots — the lower vantage gives sofas and tables real presence.
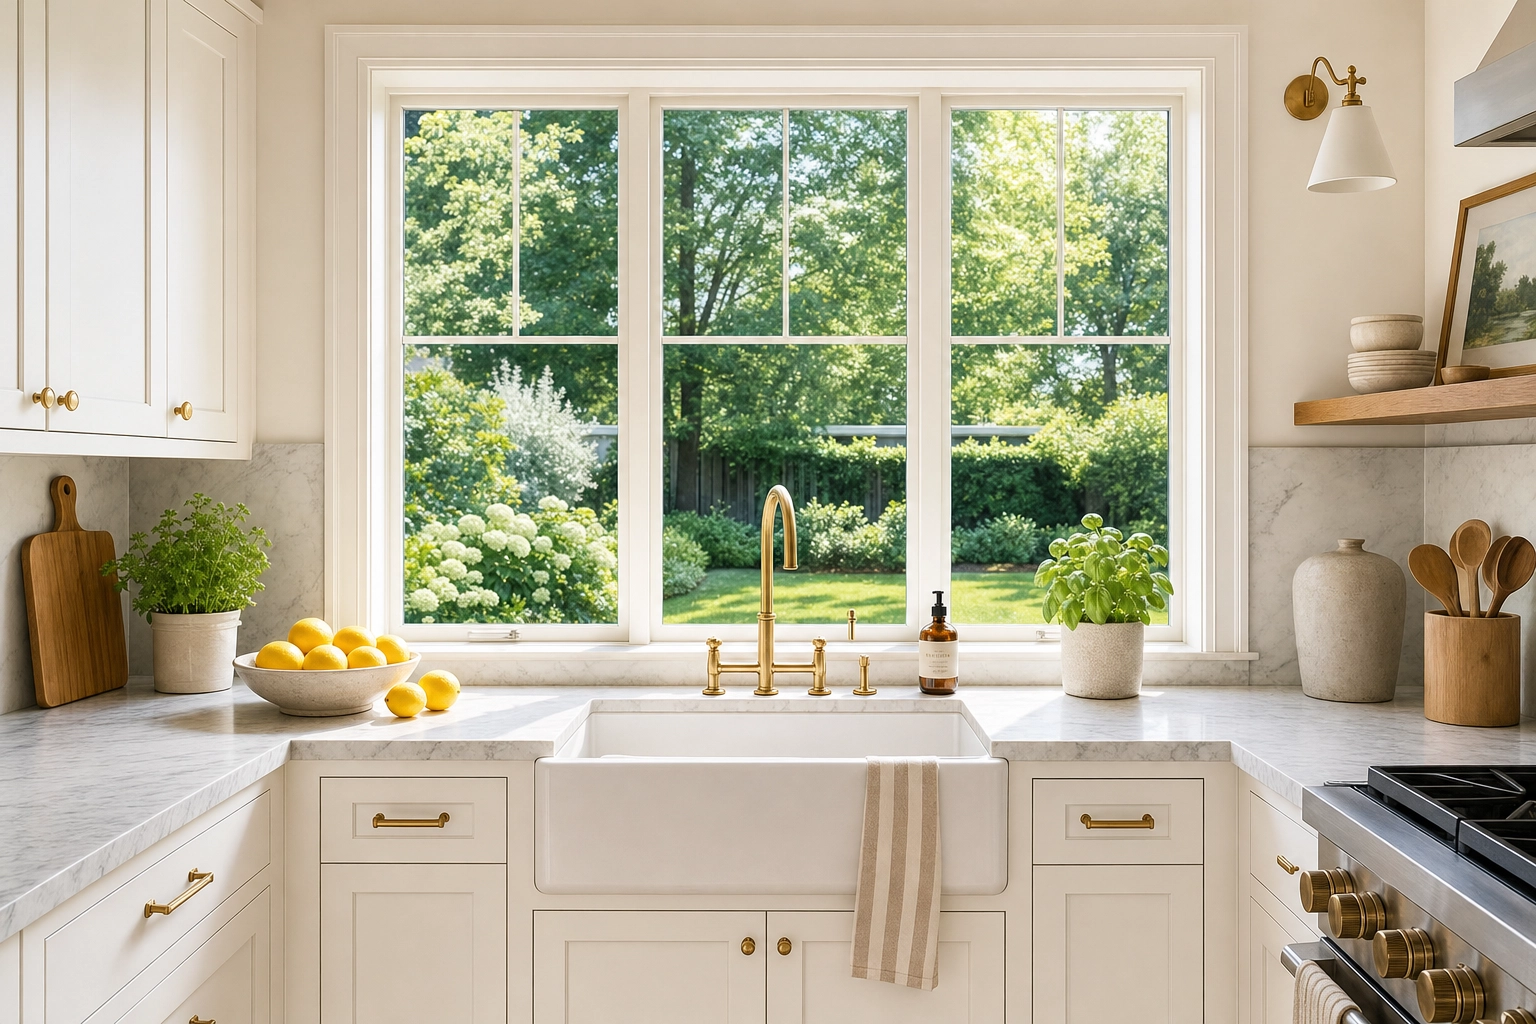
- Kitchens and bathrooms: set the camera 1–2 feet above the counter so the countertop reads as a clean surface, not a thin edge, and you avoid seeing under the upper cabinets.
- Bedrooms: 15–24 inches above the mattress so the bed reads as a plane you can see across, not a wall you're staring at.
If a vertical still ends up leaning — a low ceiling forced a tilt, or an ultra-wide stretched the corners — that's a fixable problem, not a reshoot. More on that below.
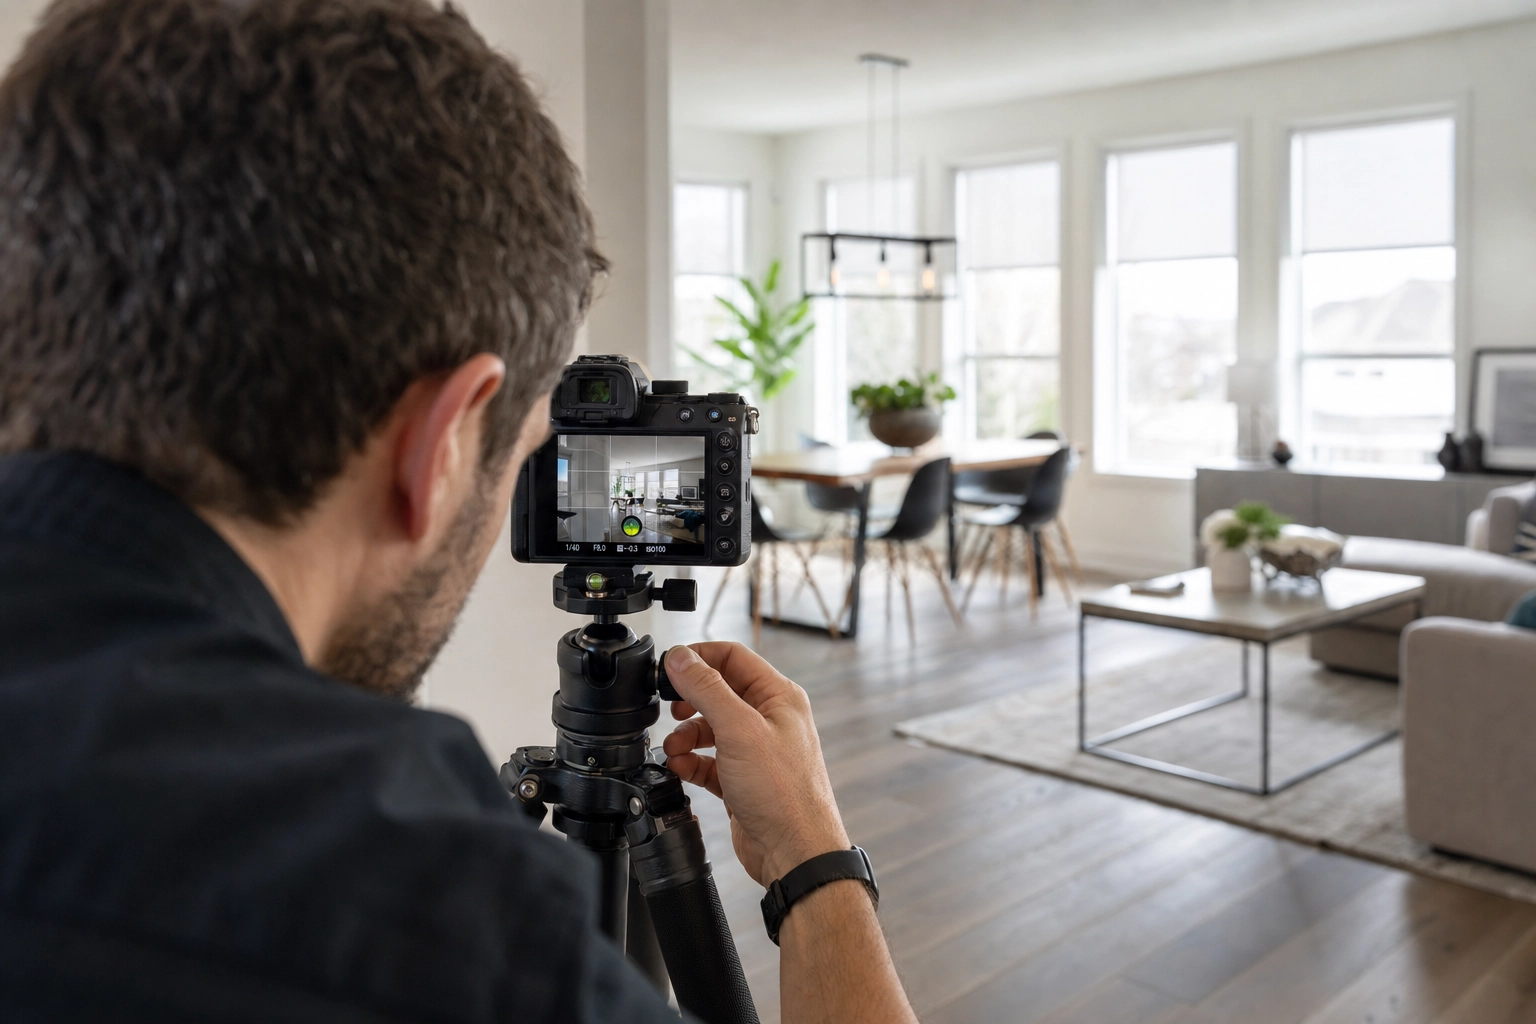
Camera settings for interior real estate photography
You want every interior frame sharp from the foreground rug to the back wall, clean in the shadows, and color-accurate. The real estate photography camera settings that get you there are boring on purpose — set them once and stop fiddling:
- Mode: Manual. Interiors have tricky light, and you want identical exposure behavior frame to frame for blending and consistency. (Aperture Priority is fine while you're learning.)
- Aperture: f/8 is the sweet spot for front-to-back sharpness; f/7.1 to f/11 covers nearly every room. Past f/11, diffraction starts softening fine detail.
- ISO: 100. On a tripod you have all the light you need from a slow shutter, so keep ISO low and noise-free; cap it at 400 if you must.
- Shutter speed: whatever nails the exposure — on a tripod, slow is fine. Trigger with a 2-second timer or a remote so you never shake the camera.
- Format: RAW, always. RAW gives you the latitude to recover bright windows and correct white balance after the fact; JPEG throws that away.
For glass, a wide-angle lens around 16–24mm (full-frame equivalent) captures a whole room without the funhouse stretch of extreme wide angles. A 24mm view is the dependable default — wide enough to show the space, tight enough to keep furniture in natural proportion. Go wider than 16mm and you exaggerate the nearest objects and bow the walls.
One framing habit: shoot a touch loose. Many MLS and portal galleries display photos in a 4:3 crop even when your camera shoots 3:2, so leave breathing room at the edges. For a full breakdown of bodies, lenses, and tripods, see our guide to gear and camera setup; for the broader fundamentals, start with the real estate photography tips pillar.
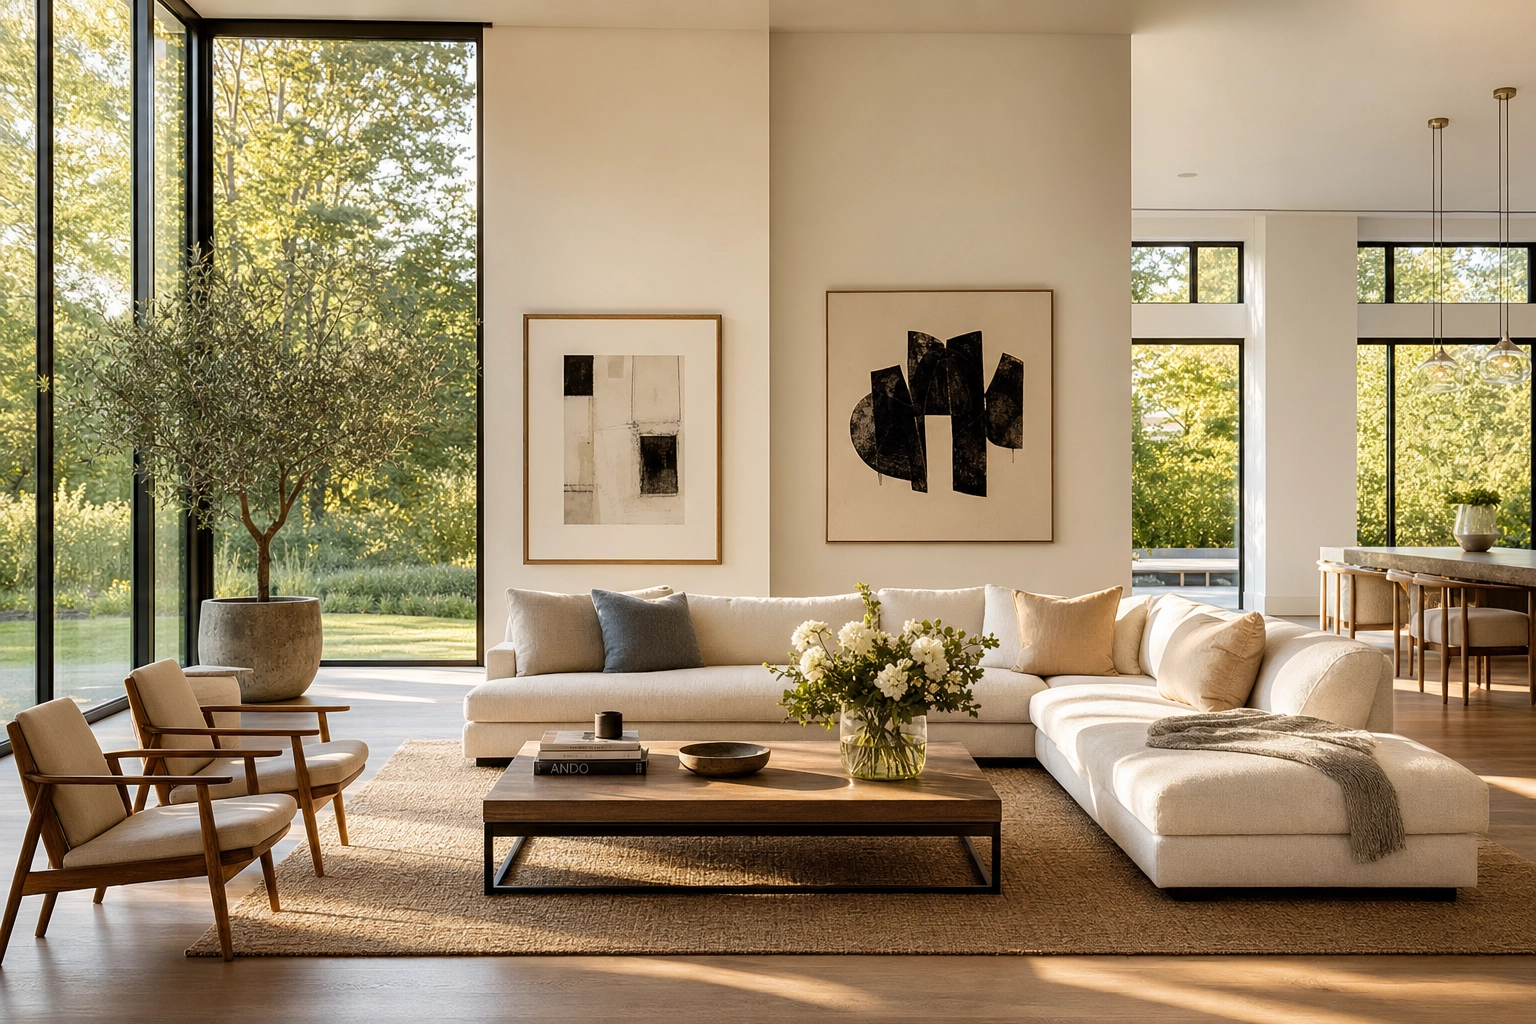
Two walls, not three: composing rooms with depth
The fastest way to make a room look bigger and more three-dimensional is to decide, deliberately, how many walls you let into the frame. The working rule among real estate photographers is simple: show two walls, not three. Whichever composition you choose, level the horizontals — they're surprisingly hard to judge by eye in a corner shot, so lean on your in-camera level.
The two-wall corner shot (your default)
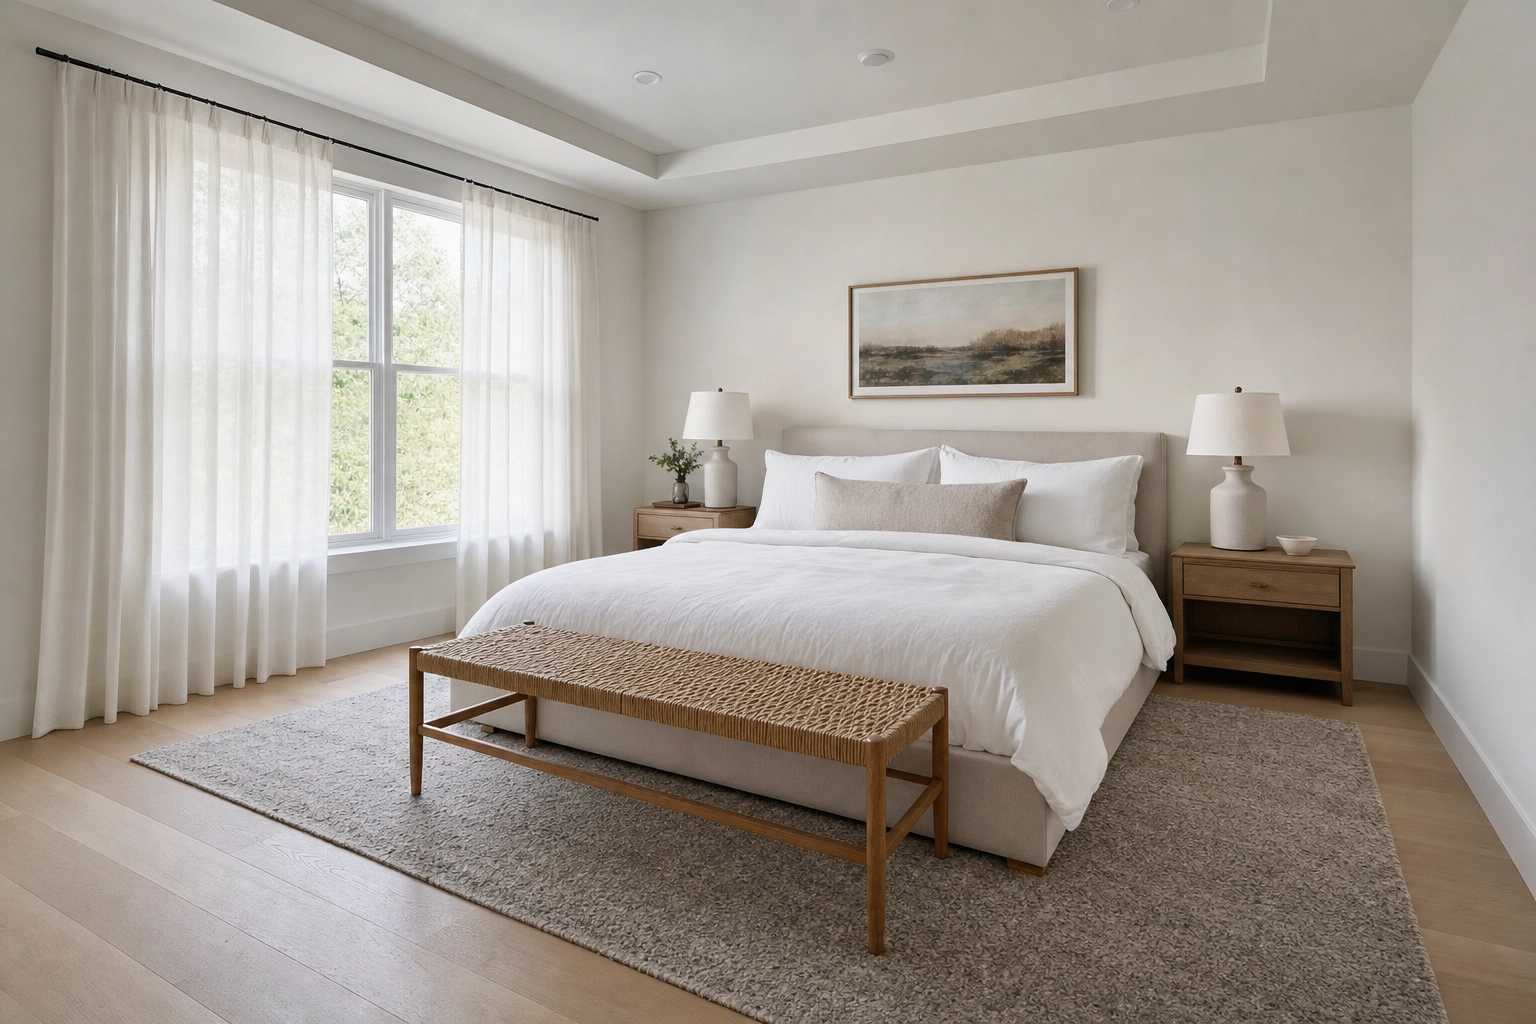
Aim the camera toward a corner so two walls recede away from each other and meet at a single vertical line. That corner line anchors the frame and gives the eye depth cues — you instantly read the room's volume and how the space flows. It's the most flattering, most reliable interior composition, and it should be your go-to for living rooms, primary bedrooms, and open-plan spaces.
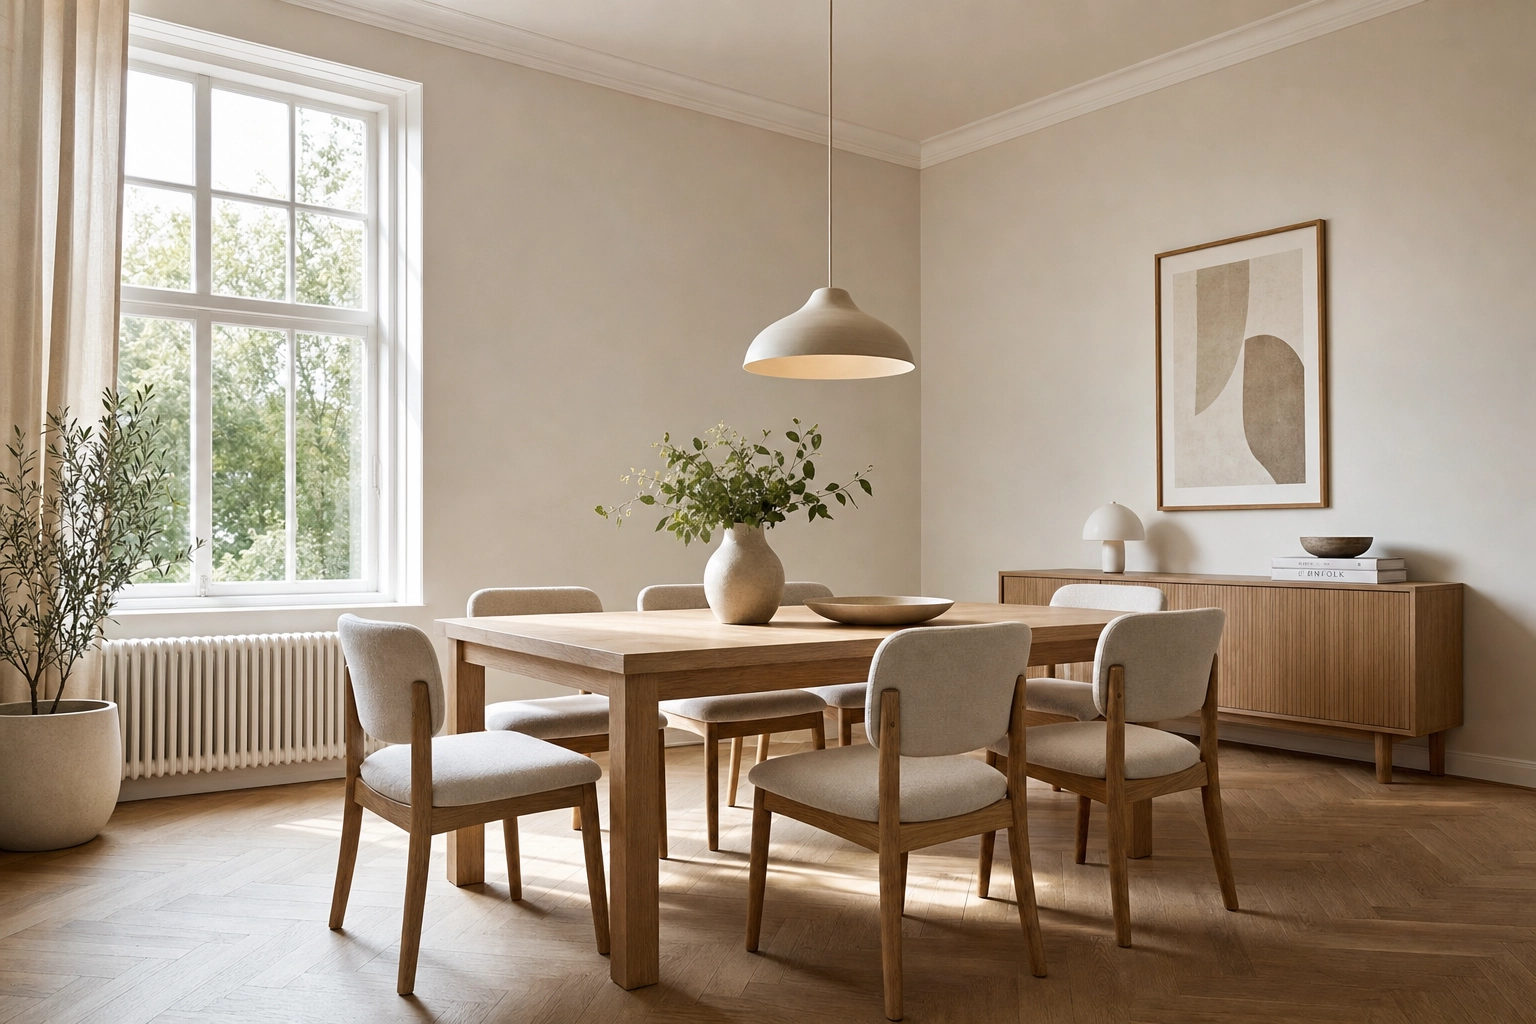
The straight-on shot (for symmetry)
Sometimes a room has a clear hero: a fireplace, a four-poster bed, a double vanity, a long hallway. Square the camera dead-level to that one wall — one-point perspective — and let symmetry carry the shot. Straight-on frames feel calm and editorial. They're flatter than corner shots, so use them as accents for focal points rather than for the whole gallery.
When three walls are justified
Backing into a corner to capture three of the four walls shows an entire small room in one frame. It's a tool for tight spaces — a powder room, a compact bedroom, a galley kitchen — where you genuinely can't convey the layout any other way. The trade-off: three-wall shots lean on your widest focal length, which exaggerates distortion and makes furniture near the lens loom large. Use them sparingly, and never try to cram all four walls in — the wall behind the camera should stay out of frame.
Lighting: window pulls and the flambient blend
Real estate photography lighting is where interior work gets genuinely hard. Get it right and a room glows; get it wrong and you've got a murky cave with three blown-out windows.
Why mixed light wrecks interior photos
Two problems collide indoors. First, dynamic range: windows are far brighter than the room, so a single exposure either renders the interior properly and blows the windows to white, or saves the view and buries the room in shadow. Second, mixed color: daylight through the glass is cool (around 5500K), incandescent bulbs are warm orange (around 2700K), and many LEDs and fluorescents push green. Auto white balance can't reconcile all three at once, so one corner goes orange while another goes blue.
The flambient method and window pulls, simply
The professional answer is the flambient technique — a blend of flash and ambient light. You shoot the same locked-off frame a few ways and combine them in editing:
- an ambient exposure that captures the room's natural mood as the base,
- a flash exposure (bounced off a ceiling or wall) that lays down clean, neutral color, even light, and natural-looking shadows, and
- a window pull — a deliberately darker frame, often with a flash aimed at the glass — that recovers the view outside so windows show sky and trees instead of white blowout.
Blended together, you get a room that's bright and color-true with windows you can actually see through. Flambient has largely replaced straight HDR (merging bracketed exposures) at the high end because it produces cleaner color and a more natural, less "processed" look. We'll publish a full flambient walkthrough soon.
White balance across the whole listing
Whatever you do, don't leave white balance on auto in mixed light. Two reliable approaches: kill the conflicting room bulbs and light the space with flash so the whole frame shares one color temperature, or, if you're working with available natural light only, set a fixed Kelvin value, shoot RAW, and correct precisely afterward. Consistency matters across the gallery, too — every room of one listing should share the same white balance and grade so the set reads as a single home, not twelve different shoots.
If a frame still lands dull, flat, or color-crossed, that's exactly what Auto Enhance is for: it corrects exposure, white balance, color, and clarity in one pass, and its batch grade-lock keeps every room of the listing matched.
Declutter and prep before you press the shutter
The camera is honest. It sees the phone charger, the dish rack, the dog bowl, and the sticky notes on the fridge — and so will the buyer. The single highest-ROI ten minutes on any shoot is spent tidying, not shooting. Depersonalize and clear before the first frame:
- Depersonalize: take down family photos, fridge magnets and papers, kids' artwork, name signs, and anything with a face or a surname. Buyers need to picture their life here.
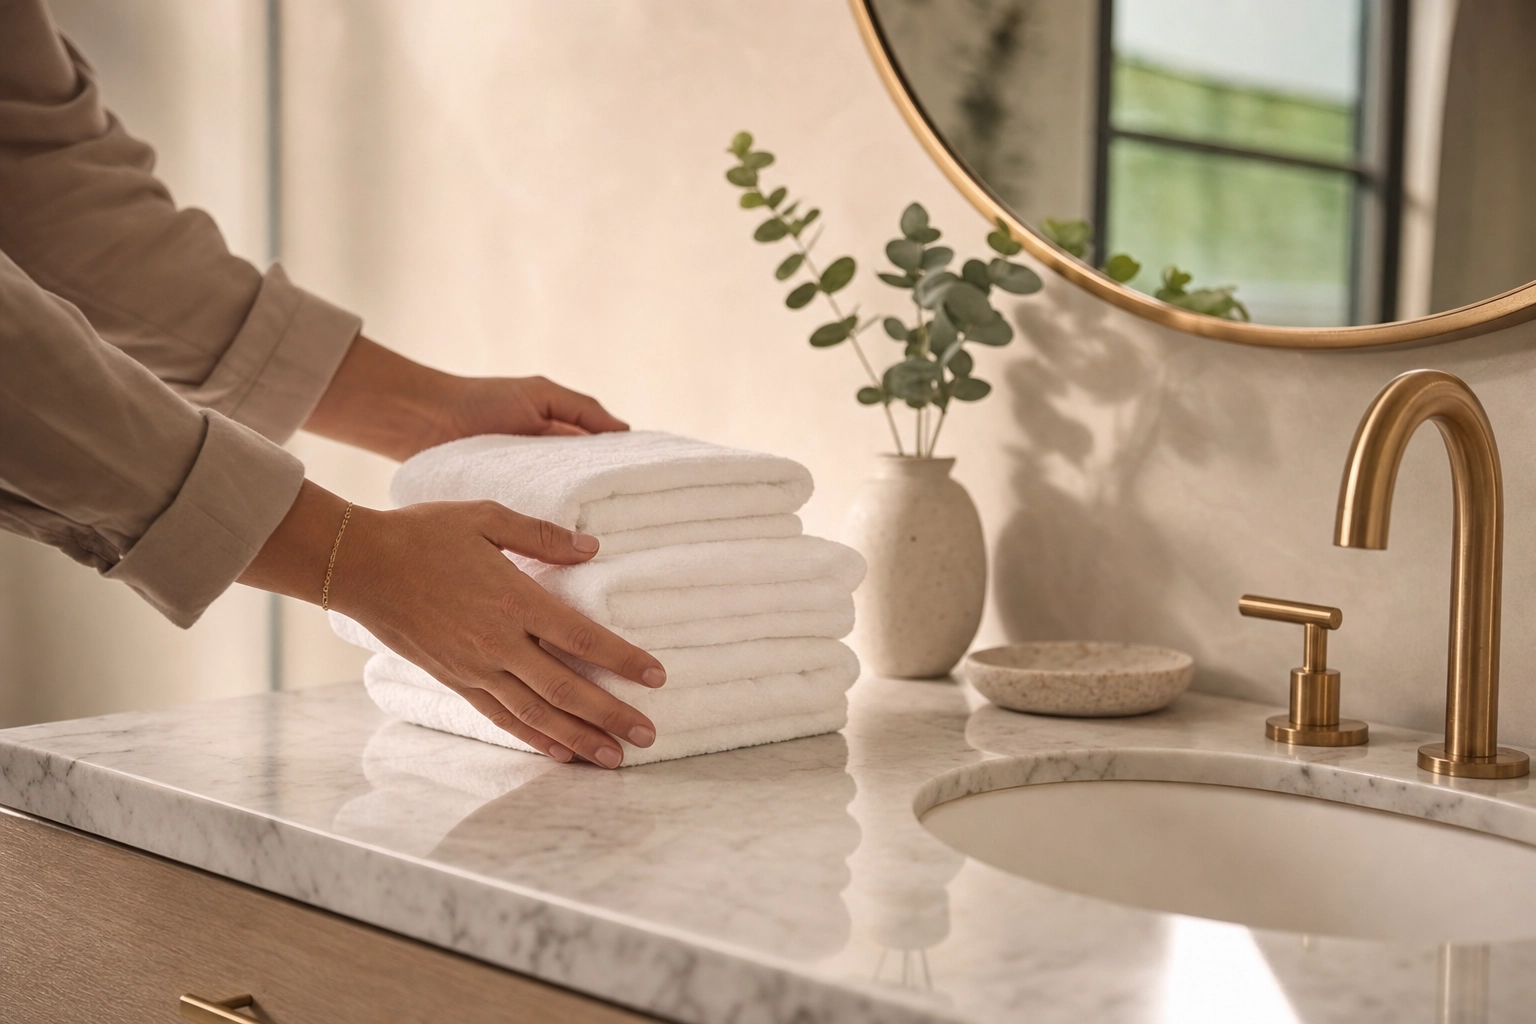
- Clear every surface: hide small appliances, sponges, and dish racks; leave one styled element like a bowl of fruit or fresh flowers. In bathrooms, remove all toiletries and set out fresh white towels. Pare nightstands back to a lamp and maybe a book.
- Remove daily life: trash and recycling bins, pet beds and bowls, shoes, coats, laundry baskets, charging cables, remotes, and tissue boxes. Toilet lids down, every time.
- Tidy and stage what stays: make the beds with crisp linens, fluff and square the cushions, straighten rugs, pull furniture out to reveal floor space, and open blinds to even, level slats.
- Hunt for reflections: check mirrors, TVs, and glass cabinets for you and your tripod before you shoot. A photographer reflected in the bathroom mirror is the one mistake editing struggles to undo.
Fix it on location whenever you can — it's faster than editing, and some things genuinely can't be repaired later. But for the stray bin you couldn't move or the cable you only spotted back at the desk, Clutter Removal brushes it out and reconstructs the texture behind it.
The interior shoot, step by step
A repeatable sequence keeps you fast and consistent, room to room:
- Scout and tidy. Walk the whole home first. Declutter, depersonalize, open blinds, and set the lights to a consistent plan before any photography.
- Set height and level. Plant the tripod at the right height for the room and confirm the camera is dead level on the electronic or bubble level.
- Lock your settings. Manual, f/8, ISO 100, RAW. Decide your lighting approach — flash or available light — and keep it consistent.
- Choose the composition. Default to a two-wall corner shot; switch to straight-on for a focal point, or three walls only for a genuinely tight space.
- Bracket your exposures. Capture the ambient base, a flash frame, and a window pull so you have everything you need to blend clean light later.
- Work room to room. Shoot the hero angle of every space, then a second angle, holding white balance and grade consistent across the listing.
- Review on site. Zoom in on verticals, reflections, and window detail before you pack up — catching a problem now beats finding it at the desk.
Fixing interiors after the shoot with Plotpane
Even a clean shoot leaves a few frames that need help. Here's the line that matters: good editing corrects what was really there; it never invents what wasn't. Plotpane is built that way on purpose — a structure-preserving pipeline, not a text-to-image generator. It won't dream up a room from a prompt or reshape your walls, windows, or floor plan. It renders 4K, watermark-free files in about 90 seconds and holds a consistent grade across the whole listing.

Straighten leaning verticals with Perspective Fix
When a low ceiling forced a tilt or a wide lens bowed the corners, Perspective Fix straightens leaning walls and tilted verticals automatically — squaring the room without you nudging sliders by hand.
Lift dull, mixed-light rooms with Auto Enhance
For frames that came out flat or color-crossed, Auto Enhance corrects exposure, white balance, color, and clarity in a single pass. Run a whole listing through it and the grade-lock keeps every room reading as one cohesive home.
Erase what you missed with Clutter Removal
The bin you couldn't move, a forgotten cable, a car parked in the window view — brush over it and Clutter Removal reconstructs the texture behind, so the fix is invisible.
Furnish empty rooms — without touching the architecture
Vacant rooms photograph cold and read smaller than they are. Virtual Staging furnishes them in seven design styles with realistic scale, lighting, and shadows, so a bare living room becomes one buyers can imagine living in.
Here's the non-negotiable part: virtual staging adds furniture and never alters the room's architecture. Your walls, windows, ceilings, floors, and dimensions stay exactly as you shot them. (If you actually want to change a surface — wall color, flooring, cabinet fronts — that's the separate Virtual Renovation tool, and it only touches what you explicitly mark.)
And always disclose staged photos. Plotpane embeds invisible XMP disclosure metadata on every staged file, but you still write the disclosure into your MLS listing remarks — our virtual staging disclosure rules guide covers what each state and MLS expects. Done right, staging is one of the best returns in listing marketing; see the numbers in our virtual staging ROI breakdown.
Frequently Asked Questions
What camera settings are best for interior real estate photography?
Shoot in Manual mode at f/8 (anywhere from f/7.1 to f/11 works), ISO 100, in RAW, on a tripod, triggered by a 2-second timer or remote. Let shutter speed float to reach correct exposure. Use a 16–24mm full-frame-equivalent wide-angle lens — 24mm is a safe default — and keep the camera level so verticals stay straight.
How high should the camera be for interior real estate photos?
Below eye level. For living and dining rooms, roughly chest height (48 to 55 inches) balances floor and ceiling. In kitchens and baths, set the camera 1–2 feet above the counter; in bedrooms, 15–24 inches above the mattress. Lower vantage points (around 30–36 inches) give furniture more presence for detail shots. Whatever the height, keep the camera level.
What is the flambient technique in real estate photography?
Flambient is a blend of flash and ambient light. You shoot the same framed scene as an ambient exposure (natural mood), a flash exposure (clean, neutral color and even light), and usually a window pull (a darker frame that preserves the view outside), then combine them in editing. The result is a bright, color-accurate room with windows you can see through — cleaner and more natural than single-pass HDR.
How do you fix leaning walls in interior photos?
Prevent most of it on location by keeping the camera perfectly level and not tilting up or down. For the leaning verticals you couldn't avoid, correct them in editing: Plotpane's Perspective Fix straightens tilted verticals and horizons automatically while preserving the rest of the image.
Is it OK to virtually stage and edit interior listing photos?
Yes — as long as you correct rather than deceive, and you disclose staging. Enhancing exposure, white balance, color, and perspective, and removing minor clutter, is standard and widely accepted. Adding furniture to an empty room is fine too, provided the architecture is unchanged and the photo is disclosed as virtually staged in your listing remarks. Misrepresenting permanent features — hiding damage, faking a view, or changing the layout — is not.
Does Plotpane create video or 3D virtual tours?
No. Plotpane is a still-image pipeline — it enhances, corrects, and stages photographs, but it doesn't produce video or 3D walkthroughs. If your listing needs a virtual tour, pair Plotpane's stills with a dedicated tour provider; the photographs are still what stop the scroll in search results.
Related reading
- Real estate photography tips — the pillar guide to shooting better listings
- Perspective Fix, Auto Enhance, Clutter Removal, and Virtual Staging
- Virtual staging disclosure rules and virtual staging ROI
- The listing photo guide